Quick answer: To save places on NAVER Map, sign in, open a place’s details, tap the star, choose or create a list, and tap Save. To share the list, set its visibility to link-only or public, then use its Share control. A private list cannot be shared.
A café saved on Instagram is easy to forget when you are standing outside a subway station. Putting your shortlist into NAVER Map means you can reopen the actual place when it is time to go. This guide covers saving and sharing; for English setup, address searches and directions, start with our NAVER Map guide for Korea.
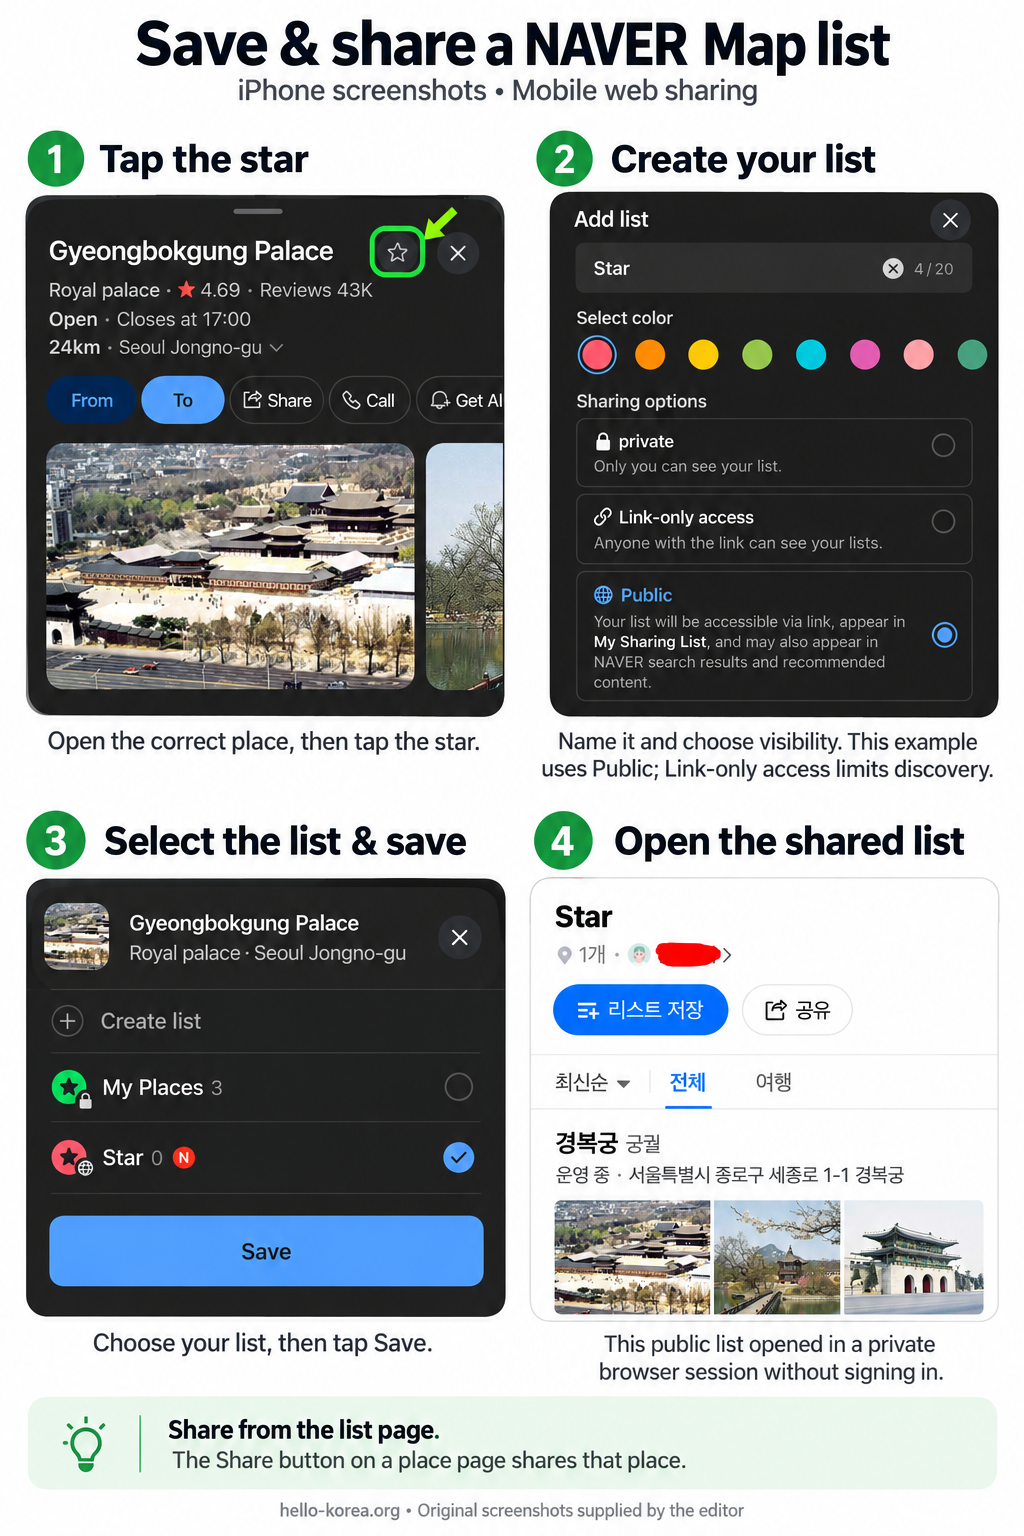
Test note: On October 3, 2026, Hello Korea’s editor supplied screenshots of the English iPhone app showing list creation and saving Gyeongbokgung Palace. The editor also opened the resulting Public list in a private/incognito mobile browser session without signing in. That confirms viewing this public list, not saving it to an account. Android and Link-only access were not separately tested. Official help remains linked below; labels can vary by version.
Before you start: sign in to save places
NAVER requires a signed-in account to store and use your saved information. Check which account you are using before building your trip list, especially if you switch between devices. For registration and the difference between an account and identity verification, see NAVER Account for Foreigners. [Official help]
How to save a place on NAVER Map
- Search for the café, hotel or attraction and open its place details. Check the branch and address before saving it.
- Tap the outline star beside the place name. In our iPhone screenshots, this opens the list selector.
- Choose an existing list, or tap Create list. The next screen is titled Add list: enter a name, select a colour and sharing option, then tap Done.
- Back in the list selector, check the intended list and tap the blue Save button. Our place screen then showed a filled green star.
- Open the Saved (저장) tab and its places section to check that the entry is there.
NAVER supports a nickname, note and related URL for a saved place. A nickname is visible only to you; notes and URLs may be visible to others who save your public list. Use notes for things such as “check afternoon break” rather than booking numbers or personal details. [Saving places and notes]
Create a list you can use during the trip
Choose the new-list option in the Saved tab or tap Create list while saving a place, as shown in our iPhone screenshots. Set the name, colour and visibility, add a description if needed, and finish. NAVER makes new lists private by default. [Creating a list]
Our suggested starting point is three small lists:
- Seoul — essentials: your hotel, a nearby station and the arrival stop you intend to use.
- Seoul — food shortlist: restaurants and cafés grouped around the areas you will visit.
- Busan — ideas: a separate list if your trip includes another city.
Keep the list name useful when you are tired and looking at a small screen. “Tuesday — Seongsu” is easier to act on than “Korea favourites 3.” A saved place is a candidate, not a confirmed stop: check its opening hours and the route before setting off.
How to share a NAVER Map list
- Open your list and check its visibility. Change a private list to Link-only access (일부 공개) for sharing by link, or Public (전체 공개) if you want wider discovery.
- Use Share (공유) on the list’s detail page, or open the list’s ⋮ menu and choose Share.
- Send the resulting link to your travel companion. Ask them to open it once before the trip and check the place names and branches together.
A shared link can open on desktop web, in the mobile app when installed, or on mobile web. The recipient can use the list-save control on the shared page to add it to their own lists. Saving it is separate from simply opening the link. [Sharing and saving a shared list]
Our private-browser check: the shared “Star” list displayed Gyeongbokgung Palace and the 리스트 저장 (Save list) and 공유 (Share) buttons without signing in. Viewing the list did not demonstrate saving it to a NAVER account. Also use the Share control on the list page: the Share button beside a place’s directions shares that individual place.
Which visibility setting should you choose?
- 비공개 — private: only you can view it; sharing is unavailable.
- 일부 공개 — Link-only access: suitable for sending a shortlist to companions. It does not appear in your public-list collection or NAVER discovery surfaces. Treat the link as something a recipient could forward.
- 전체 공개 — public: other users can discover it, and NAVER may show it in search or recommendations.
For a trip with friends, link-only sharing is usually enough. Keep accommodation details in a separate private list if you do not want them included. Changing a previously shared list back to private restricts access again. NAVER notes that removal from discovery surfaces after a visibility change can take time; do not assume a shared link or information already seen by someone can be recalled. [Official visibility settings]
If saving or sharing does not work
- A login screen appears: sign in to the account that should own the list.
- You cannot find a saved place: check the account, then the places section of Saved and the list you selected.
- You cannot share the list: check that it is no longer private, then use the Share control to generate the link. Selecting link-only visibility alone is not the final sharing step.
- A companion cannot open an old link: ask the owner whether the list has been made private since it was shared.
- You saved the wrong branch: reopen that place, tap its saved control and deselect the relevant list. If the place belongs to several lists, removing it from one does not remove it from the others.
Do not delete a whole list as a troubleshooting step. NAVER says accidentally deleted saved information cannot be restored. [Saved-information help]
Turn your saved shortlist into a route
Before leaving your hotel, choose one saved place, open its details and check directions. Compare the journey with your next stop instead of assuming that two places on the same list are close together. Our NAVER Map navigation guide explains the transit and walking screens, and our Seoul subway guide covers transfers and exits.
Leave a Reply